The Children's Nutrition Research Center's (CNRC) at the Baylor College of Medicine developed a food photography system to photograph precise portion sizes of a large number of food items to create quality standardized images used for dietary recall protocols. The CNRC photos are available in all versions of ASA24.
After the CNRC funding to take pictures ended, Westat began completing this work for new images added to ASA24-2016 and ASA24-2018 and followed the CNRC process with one exception. The CNRC used two different camera angles at the same time and Westat did not because it was determined that the simultaneous capture of two angle views was not necessary. Therefore, Westat used only one camera. Westat did, however, set up the option for two different mounting positions for the camera, since some food portions required side angle versus overhead views. Westat worked with a contractor, Shawn Chippendale Photography LLC, to take new photos to add to ASA24-2020, ASA24-2022, and ASA24-2024 versions.
Further details about the CNRC's food photography system and the process for creating the image files can be found in the following article:
- Islam N, Dadabhoy H, Gillum A, Baranowski J, Zimmerman T, Subar AF, Baranowski T. Digital food photography: dietary surveillance and beyond
 . Procedia Food Science. 2013; 2:122-28.
This page describes the food photography system specifications.
Equipment Used at CNRC
- 2 Nikon© F80 cameras with 28-125mm zoom lens and AC power supplies
- 2 Nikon© Electronic cable releases
- 2 Windows©-driven PCs, one per camera with mouse, keyboard, and monitor cable
- 2 USB cables to connect each camera to its PC
- 2 electronic flash sync cables
- 1 15" LCD monitor with monitor cable
- 1 computer monitor switcher
- 2 Nikon© Camera Control Pro© software for direct computer control and capture
- 1 Kinex© viewfinder projector
- Comet© studio lighting kit with two flash heads and stands
- Large soft light box
- Reflective umbrella
- Backdrop stand, paper backdrop, diffusion fabric, light stands, and white mount board
- Chroma-key blue paint
- Heavy tripod with attached second mount
- Food preparation table
Equipment Used at Westat
- 1 Canon© 60D camera with Canon 24-105mm ƒ/4L zoom lens and AC power supply
- 1 Windows© laptop PC with Canon camera control software installed
- 1 USB cable to connect camera to PC
- 1 electronic flash sync cable
- Calumet© Genesis 400 strobe lighting kit with two flash heads, soft box reflectors, and stands
- Manfrotto© 055XPROB tripod with tilting center column to allow full horizontal positioning of column
- Manfrotto© Magic Arm camera mounting accessory
- Seamless background paper in chroma-key blue (Savage brand, color "Studio Blue")
- Table to support background paper and provide shooting surface
- Metal ruler, 2 feet or more, to establish consistent angles
- Handmade protractor (cut from foam core board) to aid in standardizing shooting distances and angles
- Easily removable tape, such as painter's tape or masking tape
- C-stands to mount background paper
- Food preparation table
- A Nevaeh White bowl by Fitz and Floyd measuring 9” in diameter and a white Corelle Vitrelle plate measuring 10.25” in diameter
- Set of white plastic measuring spoons for infant-sized portions
- Utensils for managing food samples, extra containers to aid preparation of portions
- Cleanup supplies (paper towels, trash bags)
Equipment Used by Shawn Chippendale Photography LLC
- iMac with Capture One and Photoshop software
- Sony A7iii camera with battery grip and Godox X2 trigger
- Sony FE 35mm f/1.8 lens
- Benro Mach 3 tripod
- Sirui L-20s tripod head
- “L” bracket to attach camera to tripod head
- Sirui HA-77 horizontal arm
- Weighted bag for opposite end of horizontal bar
- Chroma green seamless paper (Savage #46 Tech Green 26” x 36’)
- (2) light stands and a crossbar for seamless paper
- Table (30”x30”x30”)
- (2) “C” stands for lighting
- Godox AD 300pro
- Godox AD 200pro
- (2) Godox S2 Speedlite Brackets for Bowens mount
- 36” Octa Quick Softbox by EZ Lock
- 2' square softbox by NEWER
- IQwire tether cable
- tape measure
- blue tape
Camera Setup at CNRC
Two cameras were used, one shooting from above and one from the side. They were set up to produce images that visually matched in size. The cameras had AC adaptors to eliminate the need to touch the cameras to power them off and on, or change batteries. Both cameras used zoom lenses that were manually set and focused.
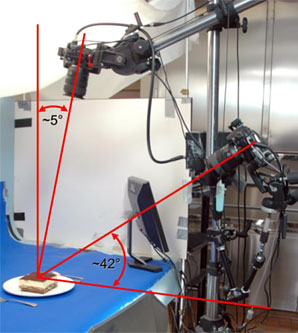
The top camera was 86.36 cm from the focal point to the film plane. The lens was set at a focal length of 40mm. The camera was set at an angle of 5° from vertical to eliminate reflections of the camera from showing on the photographs.
The side camera was 91.44 cm from the focal point to the film plane. The lens was set at a focal length of 42mm. The camera was set at an angle of 42° above the tabletop. The angle was based on previous studies concerning the ideal angles for food portion recognition (reference).
The height of the upper camera's position made it necessary to use a viewfinder projector that projected light into the camera's eyepiece and out through the lens of the camera onto the subject. This allowed for initial focusing and then the ability to view the image frame without disturbing the camera. The light was obscured when the shutter is released and did not affect exposure.
Camera Setup at Westat
Images were recorded from either a 5° off-perpendicular overhead angle or an approximate 35° to 42° above-horizontal side angle, depending on what suited the food item best; simultaneously recording with dual angles like CNRC was not implemented. Those angles were relative to, or were measured from the perfect 0° overhead angle. The tripod's tilting center column mount was used for overhead shots, whereas the "Magic Arm" accessory, mounted on one of the tripod legs, was used for the other angle that was closer to a side or profile view.
The exact distance from camera to the food item and the exact focal length set on the zoom lens were not crucial since the final image size and item positioning in the frame could be regularized in the post-production phase using Photoshop. Regardless, the focal length and distance did not change during recording of a related food item portion series. Since focal length of zoom lenses could be accidentally changed, it was helpful to use tape on the lens barrel to prevent movement.
- Typical Lens and Exposure Settings
- 85mm focal length
- 1/50 sec. @ ƒ/16 with ISO setting of 200, strobe power setting at 12 (not an absolute; only relevant to this strobe model)
Canon camera control software was used for most functions, including exposure and color balance settings as well as to preview composition and refine focus such that the photographer was not dependent on the camera's viewfinder or LCD screen.

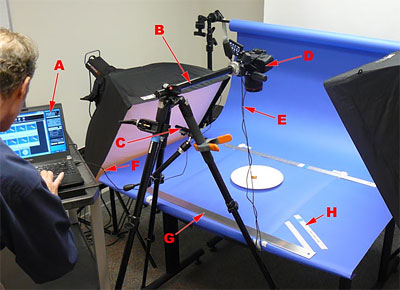
- Laptop with camera control software
- Manfrotto tripod with tilting center column, shown in horizontal position
- Alternate camera mounting position on Manfrotto Magic Arm accessory
- Canon 60D camera
- Flash sync cord and optional AC power supply cord
Note: Sync cord is connected to camera via an accessory shoe adapter on top of camera. - USB cord from camera to laptop
- Smaller section of background paper held flat by metal straightedges and/or tape
- Tape line(s) to represent desired angle of measuring spoon handles
Note: A separate ruler (not shown here) was aligned with these lines to transfer the angle to the center of the shooting area.
Camera Setup by Shawn Chippendale Photography LLC
The tripod legs were extended evenly so the base of the mounting point was at 50 1/2” high. The extension arm was connected to the tripod. The tripod head was then mounted on the extension arm. A weight bag was attached as a counter weight on the extension arm. The camera was then attached to the tripod head via the “L” bracket attached to the camera’s battery grip. The extension arm was made level, then extended to 23 ½” (measured from the mounted position to center of lens). The camera settings were: iso 100, 1/100s, f/10. The IQwire was then attached to the camera’s USB C port and then to the computer’s USB-C port. For items not shot overhead the tripod and camera were simply changed for that round of photos. Test shots were taken to ensure proper height/angle and to confirm the plate would be in the center of the frame with room to spare for cropping.
Lighting and Background Used at CNRC
Food items were photographed in a light booth constructed upon a kitchen preparation table. The booth illuminated the food without harsh shadows by surrounding it with surfaces that either diffused or reflected light. The booth dimensions were 138-cm wide x 91.5-cm deep x 122-cm high, which was large enough to move food in and out without moving the setup.
Light was supplied from two photographic flash heads with integrated modeling lamps that supplied continuous light for composing the image. The flash heads were powered through cables from a central control unit. Each camera had its own sync cord to the central unit. The main light was a large lightbox suspended from above and slightly behind the top camera. It was additionally softened through another layer of diffusion material that formed the top of the booth. Fill light was supplied in front of the food by 2 inches of exposed umbrella reflector from under the table. The left and right sides were made from white matte board. Light stands supported the top and sides to form the front opening.
The cameras were white balanced from a white card sample inside the booth. The exposure settings were f22 at 1/125 sec as determined by the light meter for the film speed of 200 ISO. This provided adequate depth of field to capture the entire subject in sharp focus.
A background stand supported a paper backdrop that gradually curved from the back of the booth to cover the table surface. It was coated with chroma-key blue paint that allowed computer artists to quickly drop out the background and replace it with their own. It is the same process that weather forecasters use for their maps and graphics.
Lighting and Background Used at Westat
Two strobe units were fitted with "soft box" reflectors to which diffusing fabric panels were attached. Only diffusers that came with the strobe reflectors were used. The angles of the two units were not always exactly matched, as sometimes the photographer found it better to use both a lower and higher angle together to get better modeling (definition of depth and contour) of the food.
All food items were photographed on the chroma-key blue paper. The paper roll was approximately 50 inches wide. Rather than working directly on the blue paper roll's surface, the photographer found it much more convenient and flexible to use smaller sheets cut from the roll and taped in place in the shooting area. This approach made it easy to slightly reposition a grouping of items or to adjust an angle. It also made it easier to recover if a small amount of wet food or liquid tainted the paper surface. Paper cut from the roll had a strong tendency to curl so that sheets were weighted down by placing heavy metal straightedges on opposite sides of the paper.
Lighting and Background Used by Shawn Chippendale
The light stands were set up opposite of each other and the table. The crossbar was then put inside the paper roll. The crossbar was then mounted onto the light stands and raised so the bar was level and at 5’. (This height is only an approximate and is based on how tall the items will be. In the attached image it shows a large white background, but that is only to separate the shooting space. Alternative methods for the surface and background could also accomplish the desired result as long as “chroma green” is on all sides of the item.)
Two lights would be used for this project on either side of the table. “C” stands would be used to ensure the lights wouldn’t move. The left stand would be the “key light or light A”. On that stand a Godox strobe, model AD 300pro, would be placed in the Godox S2 bracket. The height of this light would be 56” from the floor to the center of the light. Once turned on the light would be 1/8th power, but this power level is only relevant to this model. The 36” Octa softbox would then be attached to the Bowens mount and light, with all included diffusion material. When ready to shoot, this light’s modeling lamp would also be turned on to help light the scene. This light and softbox would be set at an approx. 60 degree angle, almost touching the surface paper. The bottom of this softbox would be 16” from the middle of the plate. This angle, distance, and power of the light should be open to change until the test shots show proper exposure, highlights, and limited glare.
The second C stand was set up camera right. This is similar to “Clamshell lighting”. This stand would have “light B”, a Godox AD 200pro attached to another Bowens mount and then the NEWER softbox with both layers of diffusion. This light was 53” from the floor and the bottom of the softbox was 26” away from the middle of the plate. It would also be at 1/8th power, but was further away from the plate. The angle of this light is approx. 50 degrees, with the flat side of the softbox touching the paper or just below it.
Image Capture Used at CNRC
Each camera connected to its own PC via USB cable. The camera software remotely controlled the cameras, and enabled images to be viewed on a large monitor while shooting for quality assurance. The software eliminated the need to handle the cameras to remove memory cards for downloading by recording the camera's image file directly to a folder on its PC. The files were transferred to a server for cataloging after each day's session.
The cameras shot ~ 3.0-mb JPEG files using the highest quality and image size settings. These files can be used for all types of output ranging from computer programs to publication quality prints. End users can process the images for their own specific needs. During the post-production phase, JPEG files were converted to PNG.
For every food item, each camera's shutter needed to be independently set off by a click of its PC mouse or by its attached electronic shutter release cable. The image was displayed on the computer monitor situated next to the cameras. A monitor switcher was used to go from one camera's PC to the other. After confirming that both cameras images were good, setup for the next shot was able to begin.

- Aerial Nikon F80 camera with 28-125mm zoom lens and AC power supply, electronic cable release and flash sync cable
- Angled Nikon F80 camera with 28-125mm zoom lens and AC power supply, electronic cable release and flash sync cable
- Windows driven PCs, one per camera with Nikon Camera Control Pro software for direct computer control and capture via USB cables
- Kinex viewfinder projector
- 15" LCD monitor
- Computer monitor switcher
- Comet studio lighting control and power supply
- Comet flash head with a large soft light box
- Comet flash head with a reflective umbrella
- Backdrop stand, paper backdrop, diffusion fabric, light stands and white mount board
- Chroma-key blue painted backdrop
- Heavy tripod with attached second mount
Image Capture Used at Westat
The CNRC approach was generally followed. Image quality was set to record both a raw uncompressed file and a JPEG file. During the post-production phase, JPEG files were converted to PNG. The camera was set to record both to the laptop's drive and to the camera's memory card as a backup. Triggering the shutter was done from the laptop, so there was no need for using either the camera's shutter button or a cord-attached remote shutter release accessory. Since the laptop was also connected via Ethernet cable to the company network, we could easily transfer files to a server location in batches rather than waiting until the shooting session was completed.
Image Capture Used by Shawn Chippendale Photography LLC
The previous approach was generally used. Image quality was set to record RAW images to the camera as well as sending them to the computer via tethering cord. This enabled us to trigger the camera via the iMac to reduce any camera shake and ensure consistency. Test shots were taken to ensure desired exposure, white balance, and lighting. We used Capture One to trigger the shutter and to make any minor adjustments before post-production in Photoshop. Photoshop was used to remove the background and reduce the size of the files.
Image Standardization Used at CNRC
Standardization was achieved through using visual cues. These cues were the placement of the table setting items within the image frame. Each camera captured a reference image once the original camera settings and image composition were set. Minute registration marks were placed on the backdrop for realignment if necessary. Regular comparisons to the reference images were made in each photo session to ensure standardization. There was no need to change any part of the system unless the visual cues did not match.
To avoid disturbing the table setting while shooting, a second plate holding the food was placed on top of the reference plate. After confirming that both cameras images were good, the top plate was removed and the process was repeated.
Image Standardization Used at Westat
Consistent object placement was aided by a combination of tape marks, and an angle guide in the case of measuring spoons. Bits of tape were used to help with consistency of object placement, to mark either centers or just inside perimeters of objects. With spoon handles, a line of tape off to the side of the shooting area that represented the handle angle was placed. A foot ruler was used as a temporary extension to transfer that angle to the shooting area and aid the placement of the spoon.
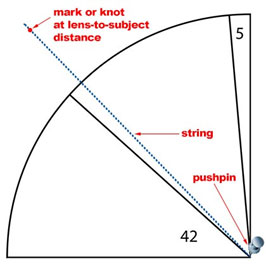
A handmade oversized "protractor" was useful for standardizing angles and lens-to-subject distances. The protractor was made by printing out the simple black lines portion of the following diagram, adhering to foam core board, and then cutting it out. A string and pushpin attached to the bottom right corner aided in the transference of angle and distance to the setup positions. Knots or black marker dots on the string can be used to establish distances.
Image Standardization Used by Shawn Chippendale Photography LLC
Tape was used to mark where the center of the frame was. An assistant ensured all settings and lighting remained consistent via Capture One. Nothing was moved once the lighting and setup was perfect, allowing for multiple days of shooting without any changes.
Alternative Text for Images
The alternative text for photos in the ASA24 database is generated from the portion description field in the user interface. The nutrition team enters this description as they update/add foods within the ASA24 database. The screen reader reads the alternative text as the image description.
ASA24 is a registered trademark of HHS.